Canada Post WooCommerce Shipping Plugin
for Wordpress
- created: 07/01/2013
- latest update: 11/05/2019
- by: TrueMedia
- truemedia.ca/
- email: support@truemedia.ca
Thank you for purchasing this plugin. If you need support, please visit the plugin page on CodeCanyon.net
Introduction
This plugin gives your website a great integration with Canada Post's live Rates and Tracking.
After installing the plugin, you just need to follow the instructions to get your own Canada Post API access. Then after entering your credentials and choosing your desired settings, the plugin is fully configured. You can then set the shipping method to be active and the parcel tracking to be active.
If the shipping rates do not seem to be correct at checkout, please remember to look at the Weight and Dimensions of the products, to ensure they are accurate and using the correct unit of measurement that Woocommerce is set to. For the rates to work, Product Weight is required and Dimensions are optional. The settings page for this plugin will allow you to adjust the rate calculation, so that you can have the best calculation possible for your ecommerce store.
This plugin also includes the ability to create Shipment Labels. In order to sucessfully create shipment labels, you will need to have an active account at Canada Post or add a method of payment (credit card) to your account at Canada post. You can check out the setup for Shipping labels to find out more.
Great! Let's continue to install and set up this plugin.
Installation
This plugin needs to be installed in your Wordpress website. It works with the WooCommerce plugin, so ensure you install WooCommerce first.
- Install this plugin by uploading the woocommerce-canadapost-webservice.zip file to your wp-content/plugins/ folder
Aternatively, you can upload this zip file through the Wordpress plugins install page. - Activate the Plugin “WooCommerce Canada Post Webservice Method”
- If there are any error messages, please ensure you have checked the Software Requirements section and have that software enabled on your server.
Canada Post API Access
This shipping plugin requires that you have an account with Canada Post. Don’t worry, it’s a free account! You can register by going to the Canada Post Developer Centre.
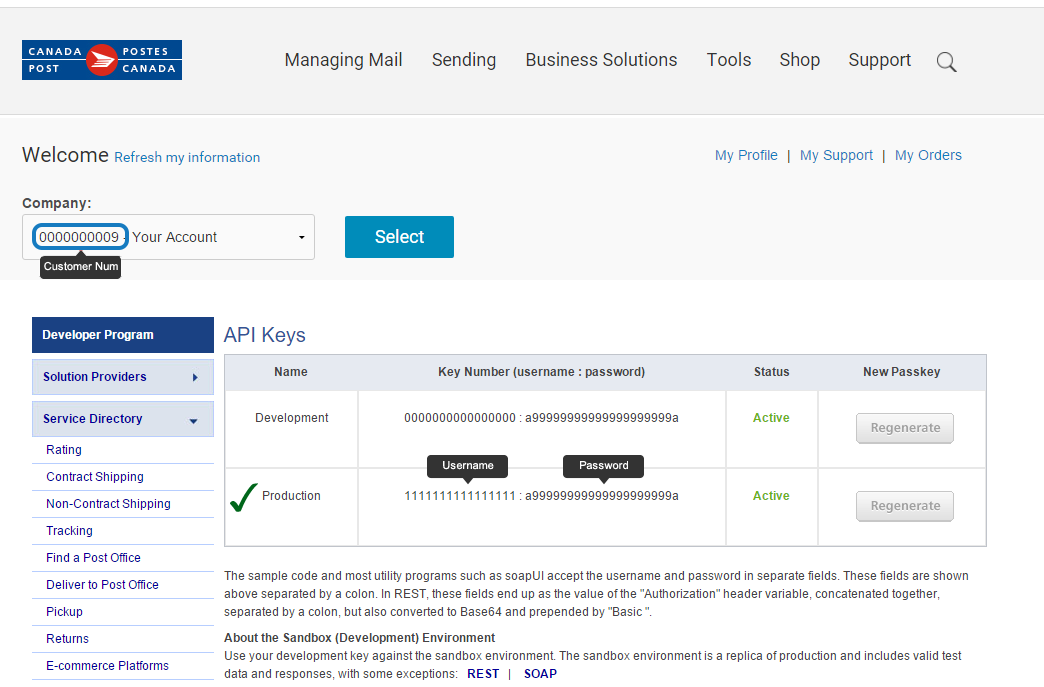
- After signing up, you will need to record the following information from the Canada Post Developer Centre:
- Customer Account Number (or Small Business number)
- API Username & API Password.
- Ensure you choose the Production API Username/Password. This is very important to get correct rates for your customers.
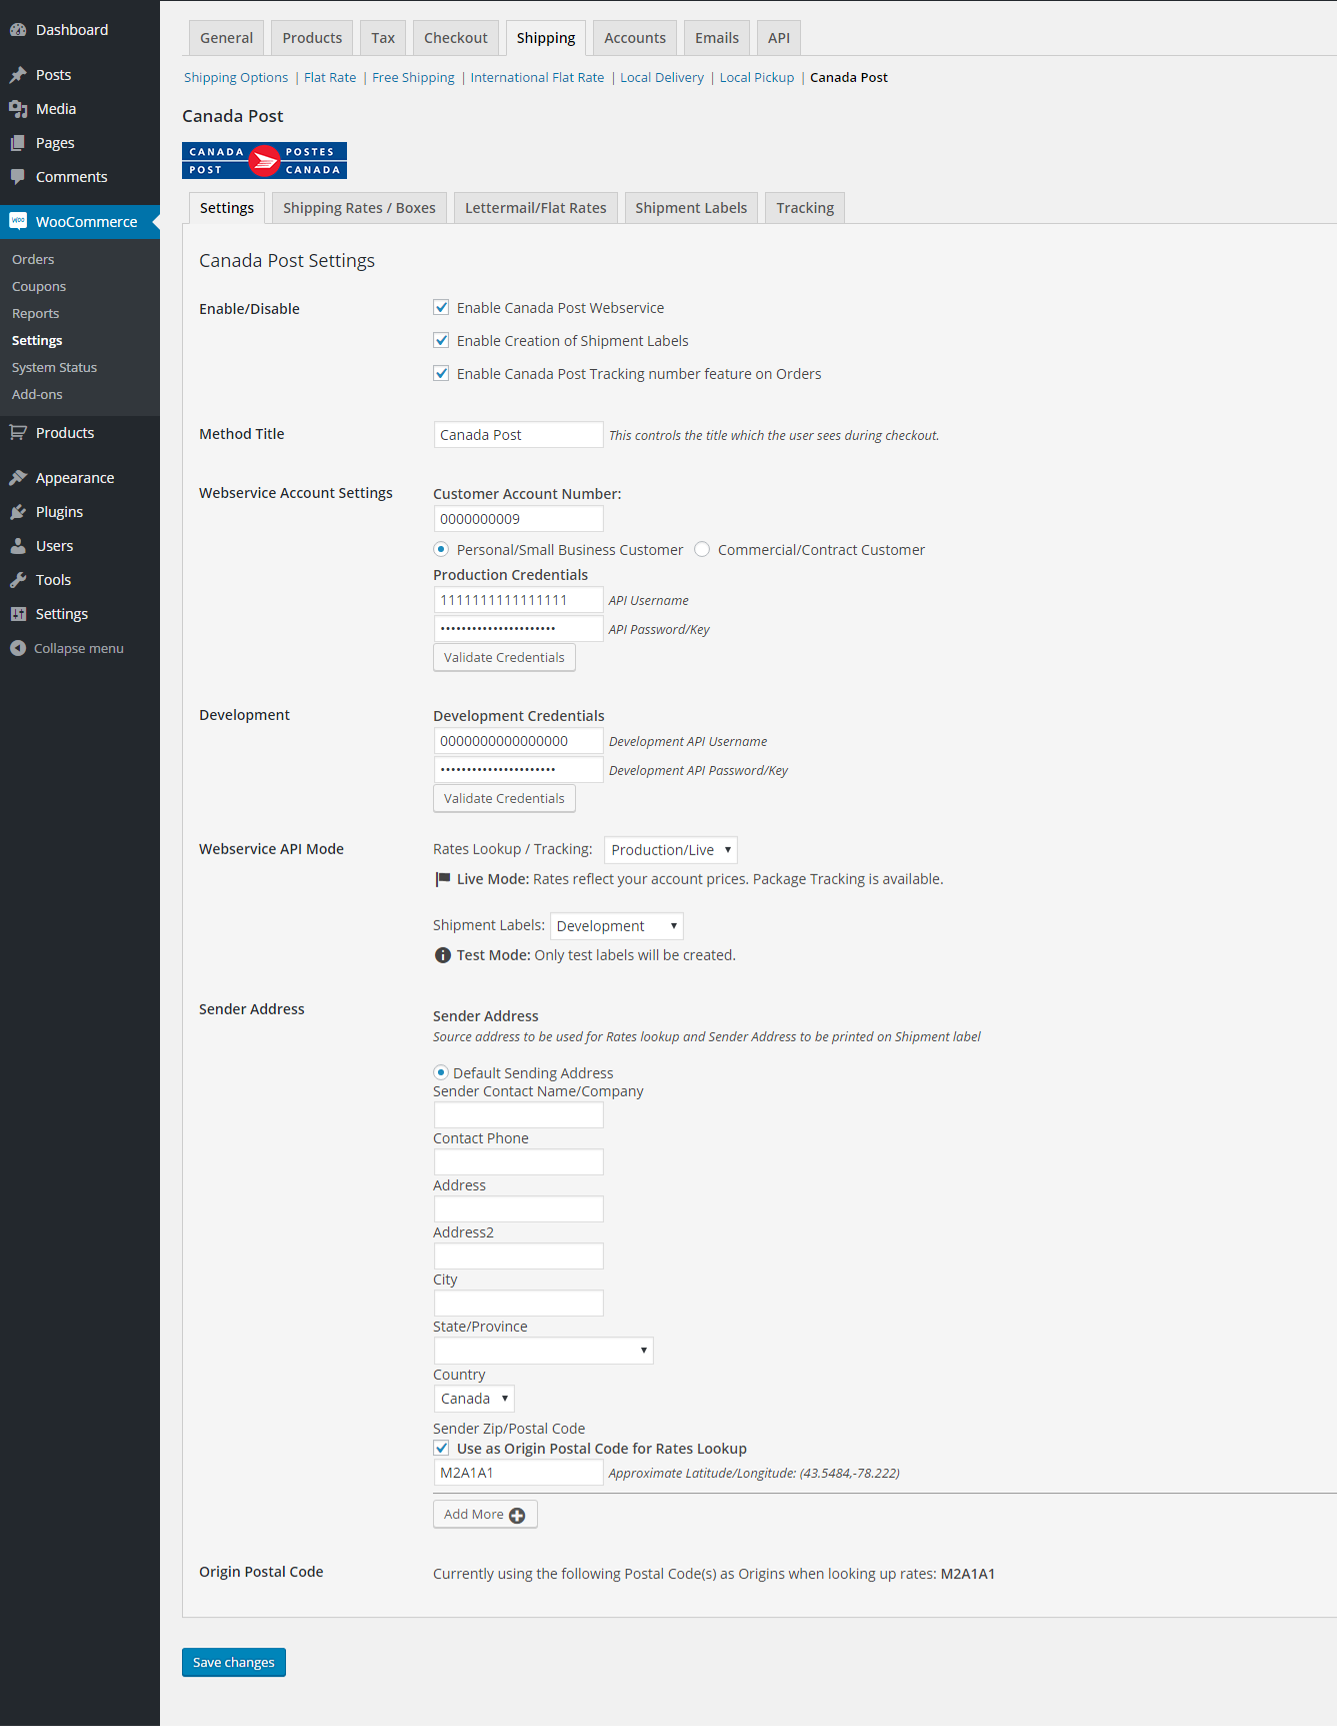
- Enter the Account Number, API Username & Password in the Canada Post Shipping Method area of WooCommerce.
This can be found by going to WooCommerce > Settings > Shipping (Tab) > Canada Post (Sub Tab). - As a minimum, you need to complete the following for the plugin to work:
- Customer Number (Venture One)
- API ID (Username)
- API Password
- Origin Postal Code - This is the location you send your packages from
- Select “Production/Live” dropdown
- After saving your settings, click the "Validate Credentials" button to see if they are set up correctly. You should see a message with "Success!" and some additional testing information. If the message indicates that it is incorrect or unable to look up rates, your credentials (API Username / Password) or Customer ID are wrong or not active yet.
- Sometimes it can take a few hours after signing up with Canada Post for your Webservices API account to become active on their servers.
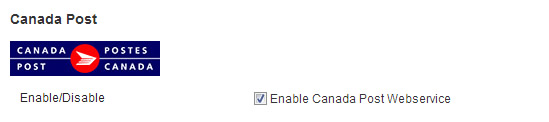
Select the “Enable Canada Post Webservice” Checkbox and Click “Save Changes” to activate.
After you sign up or log-in to the Canada Post Developer centre ( https://www.canadapost.ca/webservices ), you can find the Webservices API credentials on the main page:
Shipping Zone
You will need to add Canada Post to a Shipping Zone. (This feature exists in Woocommerce 2.6+ If you are using a previous version of Woocommerce, you do not need to worry about this).
Steps to Add Canada Post:
1. Go to the Shipping Zones page (Woocommerce > Settings > Shipping (tab).
2. If you want Canada Post for any area, click on the "Rest of the World" Shipping Zone. If you want Canada Post for only a specific zone, click on the zone(s) that you want to add Canada Post to.
3. Click "Add Shipping Method" button (bottom right). Then Select "Canada Post" from the dropdown.
That's it! Now Canada Post will be an active shipping method.
Screenshots of setting up the Shipping Zone
Initially, your Shipping Zone page will look like this. Scroll down and click on the "Rest of the Word" shipping zone.

Then click the "Add Shipping Method" button

Then Select "Canada Post"

You'll see "Canada Post" Enabled in the "Rest of the Word" shipping zone.

Settings Screen
Here is a screenshot of the Settings screen for your reference, found in
WooCommerce > Settings > Shipping (Tab) > Canada Post (Sub Tab):
Shipping Features
The following features help you adjust the shipping costs with margin/markup
Add Margin
This allows you to add a markup (increase the cost) to your shipping cost. It is expressed in Margin Percentage (ex. 5%) . If you configured 5%, then your customers would be presented the final shipping costs increased by 5% from the rates you received from Canada Post.
Box/Envelope Weight
This allows you to accommodate the typical weight of your packaging or boxes along with any paper/invoicing and materials that you add to your shipment. Typically this is a minimal weight (ie 0.02kg) because it is added to all shipments before checking the rates.
Delivery Dates
Certain shipping services/products from Canada Post will provide Estimated Delivery dates, so as to differentiate the services. You will be able to see which ones are next-day service or longer. In order to provide these dates to the customers, you are given the ability to add a number of days after the order is placed, so that you can fulfill the order, process payment, package, etc. Enter a number of days (ie. 3) in the box “Days to Ship after order placed “. Then check the “Show Estimated Delivery Dates” checkbox to enable these delivery dates to be shown to your customers in their cart and checkout.
Shipping Package/Box sizes
Configure the packages/boxes that you use to ship. Since most items are packaged, they will need to fit inside the boxes. These are used in a volumetric calculation to assist in getting accurate rates from Canada Post. Enter the envelope and box sizes in CM.

Canada Post Services
You will be given an option to choose which Canada Post products your business uses to ship items. These will be presented to your customers as options in the shopping cart. For example, if you do not use Priority post, then un-select this shipping service.
Domestic (within Canada)
- Regular Parcel
- Expedited Parcel
- Xpresspost
- Xpresspost Certified
- Priority
- Library Books
To USA
- Expedited Parcel USA
- Priority Worldwide Envelope USA
- Priority Worldwide pak USA
- Priority Worldwide Parcel USA
- Small Packet USA Air
- Tracked Packet – USA
- Xpresspost USA
International
- Xpresspost International
- International Parcel Air
- International Parcel Surface
- Priority Worldwide Envelope Int’l
- Priority Worldwide pak Int’l
- Priority Worldwide parcel Int’l
- Small Packet International Air
- Small Packet International Surface
- Tracked Packet – International
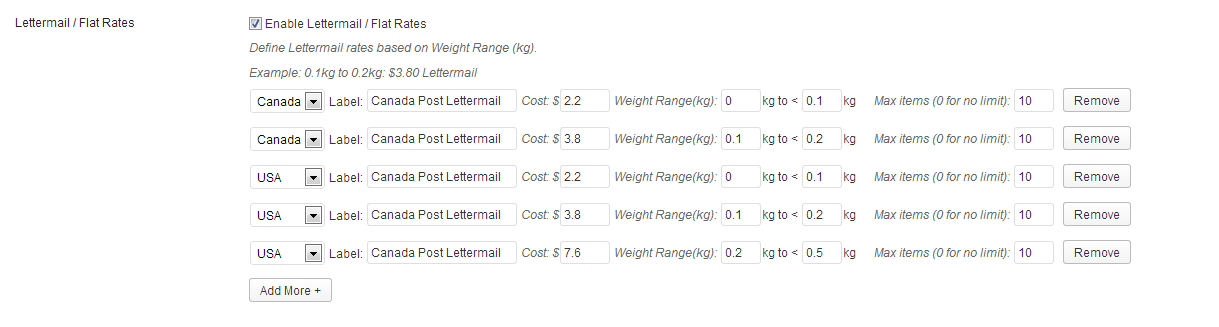
Lettermail / Flat Rates
This plugin allows you to set Lettermail rates, which is especially useful if you have small items that can be shipped economically. These can be set for both Canada and USA.
- Lettermail Canada
- Lettermail USA
The rates use the total weight of the cart and are only enabled to a max number of items in the cart. Typically, Canada Post Lettermail can be up to a weight of 0.4 kg. Please refer to Canada Post Lettermail rates on the Canada Post Website for current rates/weight restrictions.
The weight range (example 0.kg1 to <=0.2kg) only shows the price entered if the total weight of the cart is within this limit (example 0.14kg or 0.2kg).
Lettermail/FlatRates Limits
You can set a limit of maximum dimensions. To enable, select the checkbox "Maximum dimensions for Lettermail/Flat Rates (Also maximum volumetric weight)"
Then enter the maximum LxWxH in centemeters. This then disables Lettermail/Flat rates only if the item in the cart exceeds these dimensions or the total contents of the cart exceeds the volumetric weight of these dimensions.
Parcel Tracking
Package Tracking gives you an easy way to share Tracking information to your Customers.
![]()
- Go to the Order Details page of an order in WooCommerce.
- View the section labeled “Order Shipping Tracking”
- Enter the Tracking Number in the input box and click “Add Tracking Number”
- The tracking details will be looked up and attached to the order. This will now be displayed to the customer in their My Orders page and will be emailed in any invoices that you send: For example, the Order Completion action will send an Email and the tracking details will be included in this email.
- If the information was attached accidentally or the tracking number was inputted incorrectly, there is a Remove button to simply remove the tracking details.
- Before doing the Order Completion action, it is recommended to click the “Update” button beside the Tracking info, to refresh and bring up to date the Tracking information sent to the customer in the order completion email.
This shipping plugin can automatically update the tracking details on a regular basis (daily using WP Cron). It will send your customer an email if the "Mailed on" or "Delivery" dates are updated in the tracking information.
Setup
![]()
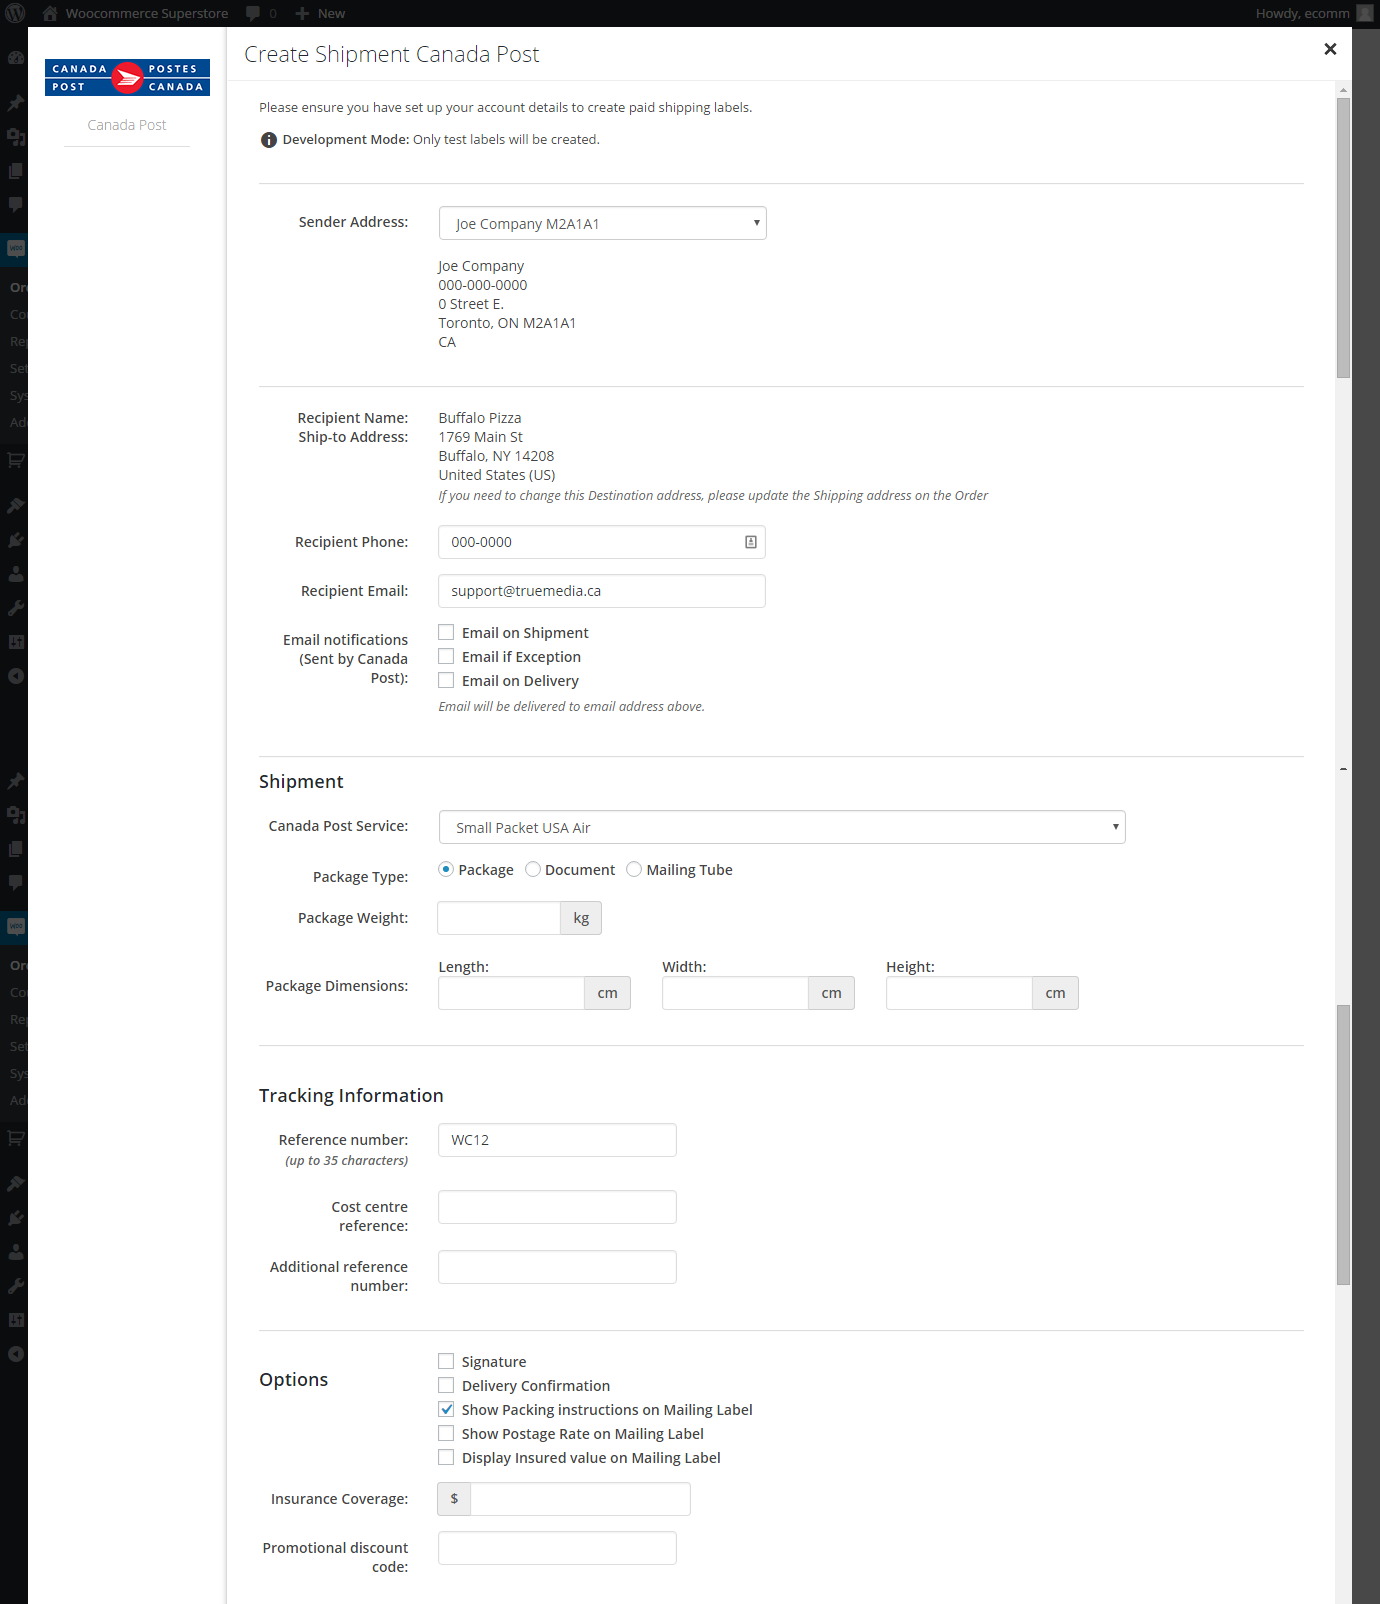
Shipment Labels
Canada Post Shipment Labels can be created from this plugin.
The ability to Create Shipments (Paid shipping labels) is provided on the "Edit Order" page in Woocommerce. On the Edit page, you will see a "Create Shipment" button.
1. Sender Address Setup
- You will need to enter your full Sender Address on the Plugin settings page. This address is what is used on the shipping label and to determine the cost of the package.
- You can define multiple Sender Addresses if you wish in order to facilitate easy label creation. (Ensure you select which ones are to be used for cart shipping rates of course).
2. Payment Method on Account at Canda Post
In order to create paid shipping labels through this plugin, you will need to add a method of payment (Credit Card) on your account with Canada Post.
- Log-in and add a default payment credit card to your Canada Post online profile. Add a method of Payment: (Visa/MasterCard/AmericanExpress)
- https://www.canadapost.ca/cpotools/apps/creditcard
At any point in time, you can view your orders on Canada Post at: https://www.canadapost.ca/order/en
- Shipment Labels to the USA or International will require you to fill out Border Customs information for the package you are shipping. This plugin will automatically load the products into the form.
- Once you create a Shipment Label, it will be billed to your account.
- Refunds: If you made a label in error, you can request a Refund, right from the interface. This just initiates a request, the actual refund action will be done through a support ticket at Canada Post.
- Shipment labels are cached on the server - you can remove these from the wp-content/uploads/cpwebservice/ folder at any time.
- Contract customers will be able to create labels as long as they are not required to submit a Manifest document. (Support for a Manifest document will come later).
Multilingual / Bilingual
This is an optional setup.
Results from Canada Post can be shown in English or Français (French) as set by your Wordpress installation or WPML language selection. The plugin includes a language file for French (fr_FR), which provides full French translation for all admin screens and labels.
Automatic setup:
- In Wordpress 4.4 and later, you can now just select the language as in the General Settings area of Wordpress.
- You therefore can select the language Français or Français du Canada. Then the plugin will use the French locale for Admin screens and communicating with Canada Post Webservices.
Manual Setup for French Language:
- If you want to change your Wordpress Installation to French, just download the French Published version from fr.Wordpress.org and add the wp-content/language/ folder to your wp-content folder:
-
/wp-content/language/*
- Then modify your wp-config.php file and set the following line to have the value “fr_FR”
-
define(‘WPLANG’,’fr_FR’);
- If you want to change any of the translated words, you are welcome to edit the .po file included in the plugin in the languages folder.
Logging and Debugging
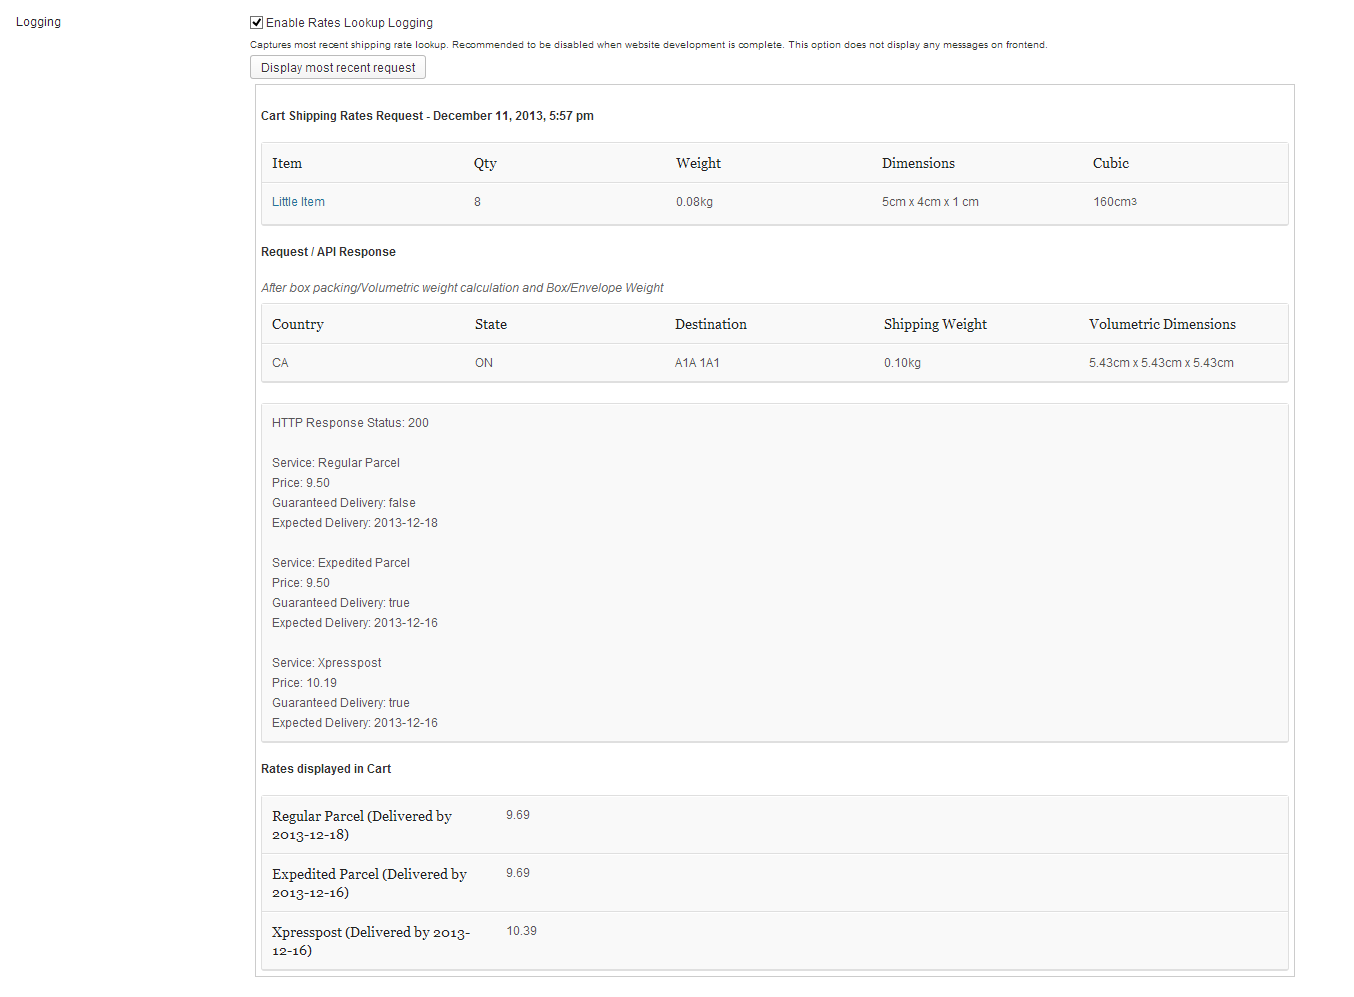
A powerful feature that is included in this plugin is the Rates Logging feature.
This allows you to capture the latest rates lookup made in the shopping cart so you can see all the variables and information contained. This feature has an advantage because it can be enabled when in production without displaying any information to public visitors.
In order to activate it, just select the checkbox "Enable Rates Lookup Logging". It will then capture the most recent shipping rate lookup that will be available when you click the button "Display most recent request".
Woocommerce does cache the shipping method lookups, so sometimes you'll need to change the quanity in the cart to activate another lookup. Also, you will probably need to refresh the settings page before clicking the "Display most recent request" button.

The following shows what can be captured by the rates logging:
- The Cart product dimensions and weight are captured
- The calculated shipping weight and dimensions are displayed (what is sent to Canada Post for rates)
- The HTTP response from the Canada Post API service. (200 is a successful lookup)
- Any error messages will be displayed here.
Software Requirements
- Wordpress 3.0 + with WooCommerce 2.2 +
- PHP cURL enabled (with outgoing Firewall configured if required)
- Canada Post Account with API Access (free)
https://www.canadapost.ca/cpotools/apps/drc/home - PHP SimpleXML (enabled by default in PHP)